Developing Your Personal Brand
 The average duration of unemployment is currently (September 2012) sitting at 39.8 weeks. That means, if you were to be laid off today, you would most likely be out of work for nearly ten months. While part of the blame for such a long average unemployment duration can be attributed to the economy, another part is the result of the current high unemployment rate of 7.8 percent.
Quit frankly, employers can afford to be extra diligent due to the increased pool of unemployed workers to choose from. This does not mean that you have no hope. It does mean that extra work is required to show that you are the right candidate for the job. You will need to stand out for your abilities rather than what you did Friday night five weeks ago.
Assessing Your Reputation
According to a 2012 Jobvite Survey, 86% of recruiters are likely to look at social profiles. This means you need to look at your profile before recruiters have a chance and remove any questionable content. Listed below are the top issues recruiters in the Jobvite survey identified negatively with:
References to doing illegal drugs—78 percent reacted negatively.
Posts/tweets of a sexual nature—66 percent reacted negatively.
Profanity in posts/tweets—61 percent reacted negatively.
Spelling/grammar errors in posts/tweets—54 percent reacted negatively.
Pictures of consumption of alcohol—47 percent reacted negatively.
Overtly religious posts/tweets — 26 percent reacted negatively.
Political posts/tweets — 18 percent reacted negatively.
Your first step should be to go through your Facebook / Twitter / Social Media accounts and view your most recent posts to determine if any of your posts contain any of the content listed above. Don’t forget to vet any pictures you’ve added or shared.
Next, you will need to Google yourself. To do this, simply open up Google in your browser and search for your name in quotes. While this can be tedious, you should review the first ten pages of the search results for any inconsistent branding issues. Do any of the search results fall into the seven categories above? If so, you will need to take action.

While doing this Google search will catch most issues appearing on Google with your personal brand, you may want to go a step further. Especially if you know that you have consistently made any posts in the past that recruiters will view negatively. To be on the safe side you can do a specialized Google search for each social media site that you use. For example, to search for all of your Facebook posts on Google you would type the following in the Google search bar: site:facebook.com “your name“

Perform this search for each social network you participate on.
Taking the Appropriate Actions
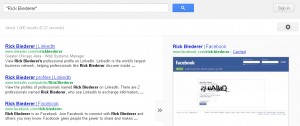
Once you have found one or more potentially hazardous posts (i.e. personal posts) on your social media accounts, you need to take action. Understand that it is important to take action as early as possible. While you may have removed all your personal posts from their respective social media sites, Google may take much longer to remove the cached content (Google’s backup of your posts) from the search results. An example of Google’s cached content link can be seen below.
If you click the “cached” link on the right hand side in the Google search results, you will see the ‘picture’ that Google last took of your post. This is how employers can see the things you have already removed from your social media accounts but Google has kept.
Since Facebook is the most popular social networking platform I will show you how to control the visibility of your posts on Facebook. The first thing you need to do is change the visibility of your Facebook posts to ‘Friends’. The step by step instructions are listed below.
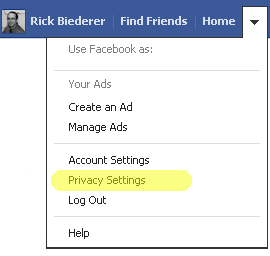
- Click on Privacy Settings
Click on the drop down arrow in the upper right corner of your Facebook Page and then click on ‘Privacy Settings’
- Choose Friends in the ‘For Mobile Apps’ section
There will be many sections on on the privacy settings page, so start with the Mobile Apps section. This section controls who sees the Facebook posts you make. Click on ‘Friends’, as seen below, to ensure only your friends can see your Facebook posts.

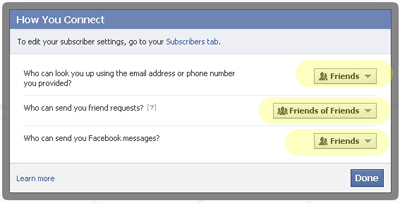
- Click ‘Edit Settings’ in the ‘How You Connect’ section
Next move on to the ‘How You Connect’ Section and click ‘Edit Settings’.

- Change the settings to what you feel comfortable with
When the window opens, you will have several choices to make. The settings below are set at the most stringent level. If you choose a less stringent privacy setting that those show below, there is more potential for employers to see something you do not want made public.
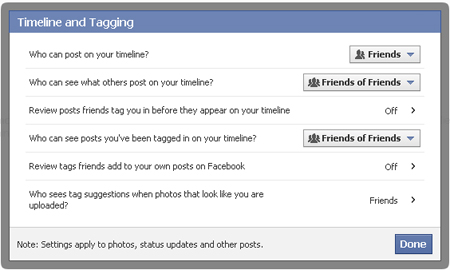
- Adjust you ‘Timeline and Tagging’ settings by clicking edit settings
Next, move on to the ‘Timeline and Tagging section and click ‘Edit Settings’.

- Change the settings to what you feel comfortable with
Most of these settings are important. Especially if you have friends who tag you in personal posts/pictures or post questionable content onto your timeline. If this is the case, at the very least change your settings to ‘Friends’ only. To disallow tagging in photo’s you will have to turn on the option, ‘Review posts friends tag you in before they appear on your timeline’. This affects posts that are made after you turn reviewing on. Existing tags will have to be removed manually by clicking on options in the lower right corner of the image.
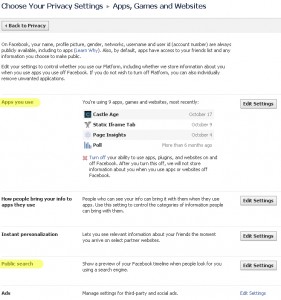
- Adjust your ‘Ads, Apps and Websites’ settings by clicking edit settings
Now move on to the ‘Ads, Apps and Websites’ section by clicking on the ‘Edit Settings’ button.

- Change the settings to what you feel comfortable with
There are two areas in this section that are important. The first is ‘Apps You Use’ and the second is ‘Public Search’. In the apps you use section you can remove an app or adjust the settings on who can see posts from that app. You will have to select each app individually and change the settings for each one. You can probably remove a lot of these apps without any consequences.In the public search section, uncheck ‘Enable public search’ if you do not want your posts to show up in Google.(Click to Enlarge)
- In the ‘Limit the Audience for Past Posts’ click ‘Manage Past Post Visibility’

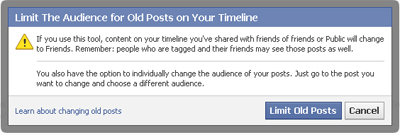
- Click ‘Limit Old Posts’ if you want to change every post you’ve made to ‘Friends Only’
If you choose to limit all of your old posts, every post you’ve made on Facebook that previously had visibility greater than ‘Friends Only’, will revert to ‘Friends Only’.
Handling Friend Requests From Recruiters and Hiring Managers
So far I’ve discussed what you can do to keep your profile out of Google and limit your post exposure to those that you have on your friends list. But what happens if the hiring manager sends you a friend request? Rejecting the friend request is probably not the best of ideas. It implies that you have something to hide.
There are two things you can do at this point. Your first option is to make all personal posts visible to only you by going to your timeline (click on your name in the upper right corner) and clicking the little drop down arrow next to each of your posts that you would like to hide and change the visibility to ‘Only Me’. You could also delete the posts entirely by clicking the pencil in the upper right corner and choosing delete.
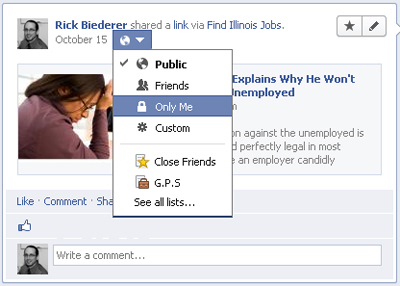
While this solves the issue of personal post visibility, it also stifles an outlet that you use to communicate with the people that you know. There is a better option available. In short, what you want to do is create a friend list, put work people and potential employers in that list, hide all personal posts from people in that list and set all your posts to be hidden from them by default automatically.
How to Create and Use Lists: Step by Step Instructions
- Click on the ‘More’ Link in Your News Feed
‘More’ should appear in the left hand navigation of your Facebook page. If the ‘More’ navigation does not appear on your timeline, skip to step 2.
- Click on the ‘More’ Link Next to Friends
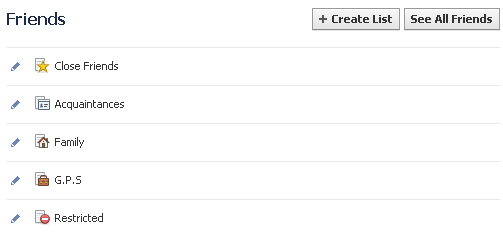
The ‘More’ link next to ‘Friends’ will only appear when your mouse cursor is hovering over the ‘Friends’ header. You should also see any existing friends lists listed below the Friends header.

- Click the ‘Create List’ Button
After you click on ‘More’, some default friends lists will show up. You want to create a brand new friends list so click on the ‘Create List’ button.
- Name Your List / Add people
Choose a descriptive name such as ‘Work People’ for your friends list and start typing in the names of people you want to hide posts from. As you type, your friends will pop and and you can choose them.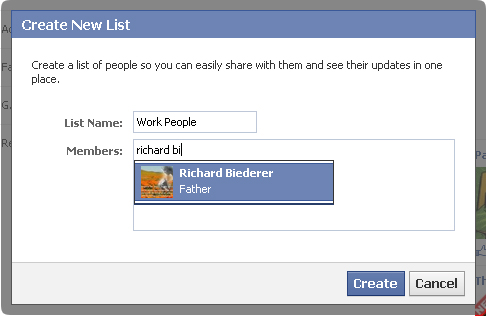
- Modify Your List
To add people to your list later, find the ‘Friends’ header on the left hand side of your ‘News Feed’ and click on the list (‘Work People’) you want to add friends to. Then click the ‘Manage List’ drop down at the top and ‘Edit List’. From the drop down ‘On This List’, choose ‘Friends’ and then pick the people you want to add to the list. Add recruiters or employees to your list as they friend you. Remember, they will see everything your personal friends can see until you add them to your ‘Work People’ list.(Click to enlarge)
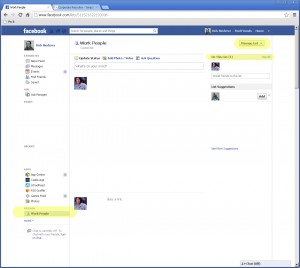
- Hide Individual Personal Posts From Your List
Now you can go through your personal posts (the ones you don’t want recruiters to see) on your timeline and change the visibility to ‘Custom’. When you do this, you have the option to hide the personal post from people on your ‘Work People’ list. The benefit of using lists to keep your personal posts private is that once you add someone to your ‘Work People’ list, you do not have to go back and change the visibility of individual personal posts any longer. All of your personal posts are blocked from view the minute you add someone to the list. You can see who can see your personal post by hovering your mouse cursor over the asterix next to the date on your personal posts. See the pictures below for a visual of each step.
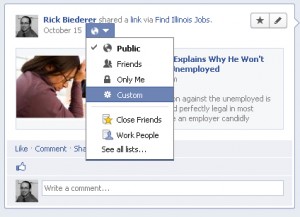
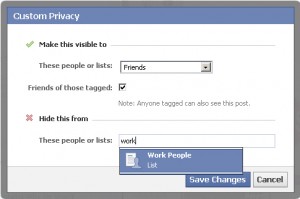
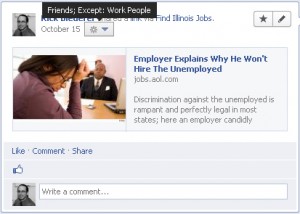
- Hide Personal Posts by Default
The last step is ensuring that future personal posts are hidden from your ‘Work People’ list by default. To do this, go into your privacy settings and change the, ‘For mobile apps’ setting to ‘Custom’ and add your ‘Work People’ list to the ‘Hide This From’ box. As a precaution, always check the asterix to see who the post will be visible to before hitting the ‘Post’ button. If it says ‘Public’ or ‘Friends’, you can change it before you post by clicking the drop down next to the post button.

Why Go Through The Trouble?
You may be asking yourself why you would want to go through all this trouble of creating lists and hiding your personal posts if you can simply set your Facebook page to hide all of your posts from everyone except people on your friends list.
Setting everything to ‘Friends Only’ doesn’t help if an interviewer puts you on the spot in the middle of an interview and tells you he has just sent you a friend request and he’d like you to go ahead and approve it…during the interview. You could say, ‘No’, and look bad or, if you’ve set up your ‘Work People’ list, you could say, ‘Sure, but for privacy purposes, I hope you don’t mind if I accept on my phone/tablet.” Then while accepting his request, add him to the ‘Work People’ list right away. All of your personal posts are kept personal and the interviewer is kept happy.
Only one state, Maryland, currently has laws in effect that prevent employers from asking for your social networking passwords. Illinois has also passed a law that will take effect on January 1st, 2013. Until then, if you do not feel comfortable giving an interviewer your password or logging into your Facebook account through their computer, you may be able to mollify their concerns by offering to add them as a friend over your phone/tablet during the interview. This will show a good faith effort to be transparent while still allowing you to add them to your ‘Work People’ list and keep your private life private.
Building Yourself as a Brand
So far everything I’ve discussed has been about cleaning up your personal brands image. While this will help segregate your personal life from your work persona, this alone will not brand you as the competent expert that you know you are.
According to a survey by Execunet, 77% of recruiters use search engines to find background data on job candidates. This presents an absolutely huge opportunity for you to stand out among your peers. Any recruiter that is going to be doing a background search on you, will undoubtedly be searching for your name. This gives you the opportunity to determine exactly what the recruiter will see.
By authoring your own content you can determine what the recruiters are reading about you and how they view your professional skill. The question is, where do you place this content? There are two places that relatively easy to make your content visible. First, you can write guest posts for popular blogs and websites that fall into your area of expertise. The second, is by authoring content on your own website or blog. Don’t worry if you do not have your own website yet.
Writing Guest Posts
To write a guest post for another website you first have to find an appropriate website to write for. A good way to do this is to search Google. What you will want to do is search for your profession and blog. For example, if you are an accountant you would search for: accounting blog
Once you’ve found several potential websites/blogs that you would like to write a guest post for, find the contact form on the website and ask them if they accept guest posts. Include your name, contact information, the topic of the post you’d like to write about and assure them that the article will be unique and placed on their website only. Let them know you are only looking for attribution through a bio somewhere on the article page. Also, ask them if they have any requirements for the article such as length or a deadline.
Publish Your Work on Your Own Website
Starting your own website is a very powerful way to improve your personal brand and it isn’t as difficult as it sounds. You will need two things to start your own website, a domain name and a hosting account. Both can be purchased from Hostgator for very little cost.
If you buy a Hostgator domain name and hosting account through the links on FindIllinoisJobs.com, I earn an affiliate commission and it will help support this website. I also highly recommend them. I run this website and several other websites on Hostgator’s shared hosting servers and I have yet to run into any issues with them.
If you decide to start running your own website and need help with the initial setup of your site, contact me and I will be more than happy to help you for free (time permitting).
If you choose to do it yourself, there is a fantastic e-book called WP Starter Guide by Lisa Irby that does a great job helping people just starting out with WordPress Websites. Purchasing WP Starter Guide through the links on FindIllinoisJobs.com also helps support FindIllinoisJobs.com. I have personally bought this book and know from experience that it can help people who are just starting out with WordPress.
By starting your own website and publishing your content on it, you have the opportunity to present the information that recruiters are seeking about you, in a way that is the most flattering to you. As an example, let’s say that you are going to be applying for a position as a CPA for a medium-sized retail shop. You know they are specifically asking for retail experience and that they require experience with the Brand X point-of-sale system.
Before you apply for this job, you should write an incredible article about retail accounting for mid-sized businesses using the Brand X point-of-sale system. In as little as a few days your article could be showing up in the search results when recruiters or hiring managers search for your name. Now when they research you, one of the first things they are going to see is your article, on your website, talking about a business need they need to fill: A CPA with retail experience and Brand X point-of-sale experience.
One last note on starting your own website for branding purposes, make sure to write content regularly. Try and add content once a week at least.
Claim Your Name
Finally, you need to claim your name on the important social media websites. This will mean you have to create accounts on Twitter, Facebook, Google+, LinkedIn and Pinterest using your name as a username. If you cannot get your exact name, use something as close as possible. For all social media accounts, use a real picture of yourself as your profile picture. Recruiters need to know it is your account they are looking at. Preferably, use a professional head shot .
Even if you do not actively use all of the social media accounts you have set up, it is important to claim them. It will prevent any confusion if someone else with your name becomes active on those websites. Also, if you have created a website, most of your social media profiles can be ‘attached’ so that posts displayed on your website will be automatically shown on your social media accounts.
All of it in a Nutshell
I’ve covered quite a bit of information in this post so I think it is pertinent that I consolidate everything into a more manageable high-level view.
Increasingly recruiters and hiring managers are researching potential employees online and through social media websites. Considering the permanent nature of digital media and the convoluted privacy practices of some social networking websites, it is imperative that you as a job seeker do your due diligence into what is being presented about you online. Finding and fixing issues that reflect poorly on your personal brand will take time and effort but it is well worth it.
It is equally important to ensure that all future personal posts on your social networking profiles remain between you and your close contacts, and that your professional posts are the ones prominently displayed. Setting up your privacy settings and distribution lists correctly can accomplish this task and give you a clean personal brand.
Once you have properly controlled your personal posts and set up your future personal posts to be distributed to your trusted list of friends, you can start on putting out the personal brand image that you would like recruiters and hiring managers to see. Accomplishing this can be easy with the combination of providing guest post content to existing prominent websites in your field of work and creating your own website (on Hostgator perhaps?) that demonstrates your expertise.
Finally, it is important for you to claim your name on the popular social networking platforms. This prevents brand confusion and allows you multiple avenues of pushing your message to recruiters and hiring managers and presenting yourself in the best possible light.


 ';
}
?>
This is why I do not like being tagged in Facebook pictures or posts… if I am on a night out with friends things can be so easily taken out of context.
Once something is said or published on social media, it’s hard to take it back.
This is very insightful. Thank you so much for taking the time to write this article and the step by step instructions. You are awesome!
I’m glad you found it useful!